-
Notifications
You must be signed in to change notification settings - Fork 0
Module 0, Install GeoDMS GUI and setup a configuration


learning objective: Install a GeoDMS version and work with a configuration on your local machine
- Download a version of the GeoDMS, we usually advice the most recent version.
- Install the software, see Installation Instructions up to and including part I.
- Download your first configuration here
- Unzip it in a project specific folder, which we call the ProjDir-folder, for example "C:/ProjDir/FirstConfig".
- The root configuration file to be opened is usually located in the cfg subfolder of the ProjDir, also called the ConfigDir, and often called something like stam.dms. In this example the file is called: basics_my_first_geodms_project.dms. So the file to be opened is something like: "C:/ProjDir/FirstConfig/cfg/basics_my_first_geodms_project.dms". For a broader overview of the suggested folder structures see Folders and Placeholders.
- Start the installed GeoDMS GUI
- Go to the menu option: File > Open Configuration File, navigate to and open the basics_my_first_geodms_project.dms file.
- Select the my_first_param parameter in the treeview (at the left) and double click in this item to see the contents in a table. Moving your mouse to the right border of the table presents a mouse pointer with two arrows. Keep the mouse pressed to adjust the column width, to make the text fit in the table.
Your GeoDMS GUI should now look like this:

In the GeoDMS GUI, with the menu option: Tools > Options, relevant options can be set.
- Make sure the option: Show Hidden Items is enabled to show the Advanced tab
- The Configuration tab is only shown if a configuration is loaded.
Most default settings are fine, but some settings are regularly overruled.
In the GeoDMS we often refer to a SourceData folder (for read-only source files) and a LocalData folder (for (intermediary) results and the CalcCache).
In configurations %SourceDataDir% and %LocalDataDir% are Placeholders.
The machine specific drives/folders for SourceDataDir and LocalDataDir, can be set with the Tools > Options > Advanced Dialog:

By default, GeoDMS looks for SourceData in C:/SourceData and LocalData in C:/LocalData. You can configure your machine specific folders here.
We advise to configure the LocalDataDir not to a network drive, as the CalcCache will be stored in this folder.
From the GeoDMS GUI treeview you can activate the corresponding line in a configuration file for a selected item. Use the CTRL + e keyboard combination, or the pop-up menu option (mouse right-clicking) > Edit Config Source.
We recommend using the text editor Notepad++,. We also advise to download the GeoDMS language file here: http://svn.objectvision.nl/public/geodms/trunk/res/NotePadPlusPlus/GeoDMS_npp_def.xml GeoDMS/dev/res/NotePadPlusPlus (username: guest, password: guest, if you see the xml-code, go back and save target as). For instructions on how to import this language file into Notepad++ see Setup GeoDMS language file in Notepad++.
To make sure GeoDMS understands where Notepad++ is installed, make your the reference is correct in the Advanced options, External programs section, for example:
C:\Program Files\Notepad++\Notepad++.exe "%F" -n%L

To test this, select the item: my_first_param in the treeview and activate from the pop-up menu (right mouse click) the option: Edit Config Source (you can also use the Crtl - E key combination).
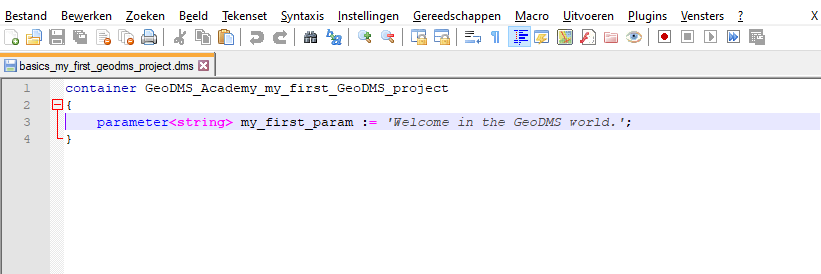
The file editor should now be opened with the cursor on the line of the selected item. If you installed the GeoDMS language files, your editor should look like this

Edit the text: Welcome in the GeoDMS world, save the changes and reopen the configuration.
This is a common way of working with GeoDMS configuration files.
Go to next module: Module 1, Learning the basic concepts of GeoDMS
GeoDMS Academy

- 0: Install GeoDMS GUI and setup a configuration
- 1: Learning the basic concepts of GeoDMS
- 2: Loading and storing data sources
- 3: Basic analyses with vector data (WORK IN PROGRESS)
- 4: Basic analyses with grid data (WORK IN PROGRESS)
- 5a: Working with networks over a road network
- 5b: Working with networks in a public transport setting
- 6: Allocating land-use