-
Notifications
You must be signed in to change notification settings - Fork 0
Design
We went with a basic default color screen for our app. White screens with black buttons for standard actions, and red buttons for deleting a device. The hope is to stick to a universal design between the two apps that will more closely resemble Google's Material You design language. We used the app Justinmind to collaboratively work on the designs for the Android (client) and desktop (server) app. Justinmind is a prototyping and design tool for used to create high-fidelity prototypes.
The home screen allows the user to add devices to their Neptune app and change the name of the device using the app. The user can click on a device to open settings regarding that specific device, or they can click on their name at the bottom of the screen to open a dialog box. This will instruct the user to enter their desired name into the text box and click either rename to rename the device or cancel to stop the renaming process. Clicking either of those will return the user to the home screen.

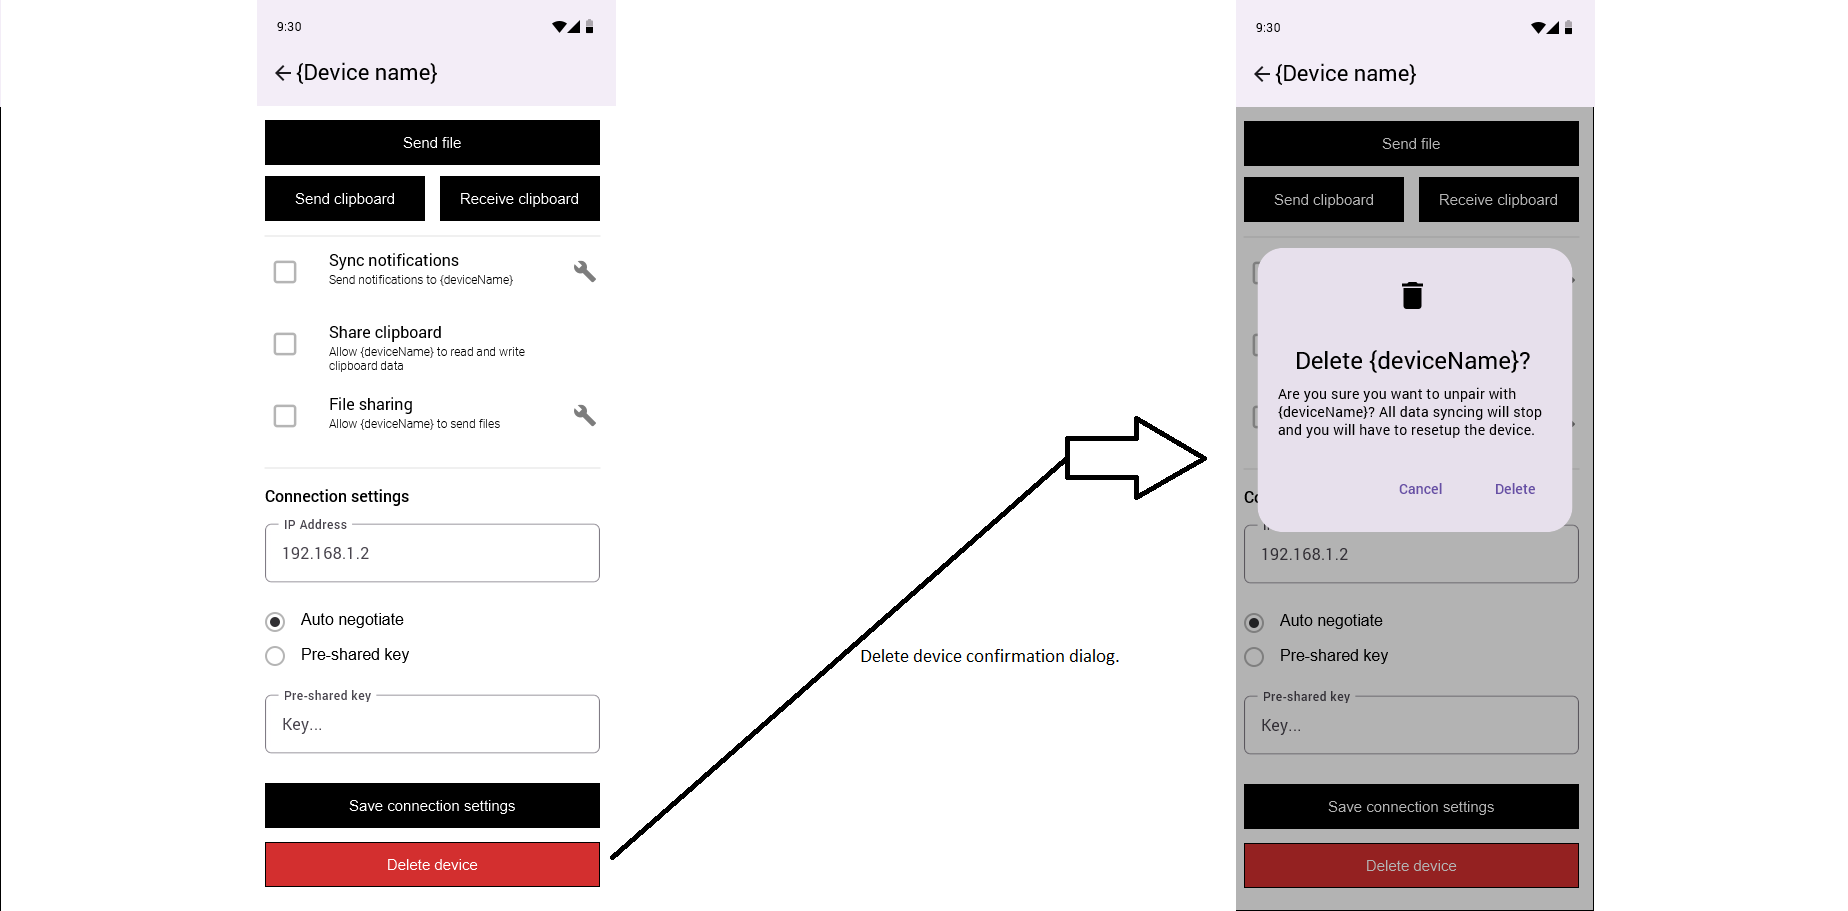
The left most screen is the device settings screen. The device settings screen allows the user to change how the client app interacts with the server application. This is the screen that pops up when you click on a device's name on the home screen. There are multiple buttons including sending a file, sending the clipboard data, receiving the clipboard of the connected device, saving settings, and deleting the device. Within the device settings, there are further settings for syncing notifications, sharing the clipboard, and file sharing. These are toggled using check boxes.
The "send file" button opens the Android file picker dialog for the user to browse, select, and send a file to the remote device. The "send" and "receive" clipboard buttons allow the user to send the Android device's clipboard to the remote server, or receive the clipboard data of the remote server. (Note, the "share clipboard" setting must be selected on the server side device configuration.)
The "sync notifications" toggles the whether or not notifications from the client are sent to the user's device running the server application. Clicking on the wrench icon opens a screen allowing the user to choose which apps they would like to have notifications sent to the server.
The share clipboard box allows the server to read and write to the client's clipboard (this does not affect the two "send" and "receive" clipboard buttons on the client app).
The file sharing setting allows the user's server to send files to the client app (this does not affect the "Send file" button).
The wrench icon opens the file sharing settings screen which allows the user to choose a destination folder for incoming files and if they would like to be notified upon receiving a file. The built in Android file picker is used to pick a destination folder.

When the delete device button is pressed a dialog box pops up asking the user if they are sure they want to delete the device. Hitting delete removes the device from the mobile app and returns the user to the home screen, while hitting cancel returns the user back the the device settings screen.

The main screen of the server app houses all device controls front and center. A list of devices is shown on the left, in the middle is the selected device configuration, and on the far right is recent notifications from the selected device.
Above the device configuration section is the device name as well as the device's battery life.
The "send file" button opens the OS's file picker dialog, the user selects a file, and the server sends the file to the device. The receiving device (Android app) must have "file sharing" enabled in the device settings. (To send a file to a device, the other device must check the "file sharing" box on that device's end).
The "sync notifications" toggles the whether or not we listen for notifications from the client.
The "sync clipboard" box allows the client (Android app) to read and write to the server's clipboard (this does not affect the two "send" and "receive" clipboard buttons on the client app).
The file sharing setting allows the client app to send files to the server (this does not affect the "send file" button). The user can enable automatic acceptance of incoming files, notifying on receive, and the destination folder.
The connection settings is where user can configure the key exchange settings (auto (Diffie-Hellman Key Exchange) or a pre-shared key (passphrase)) and the IP address of the client (may be dropped). The "test connection" button test the entered IP and key exchange settings, and the view connection details button opens the "connection details" window.
And of course the user can save their changes and delete the device.
On the far right side is where the user can view recent notifications from the device and act on those notifications (delete, activate, etc).

Below are three miscellaneous windows for the server app.
The "server setting" window is accessed by click "file" and then "server settings" from the main window. Here the user can change server specific settings, such as the device name and the listening address.
The "device connection details" show details about the currently connected and selected device. Details such as the device IP, current key negotiation, a hash of the encryption key (to verify end-to-end encryption), the encryption method used, and connection latency.
And lastly, the "about" page ("help" -> "about") shows the name of the project, version info, a link to the GitHub repo, and our names.

While Qt will be used, in some capacity, for server GUI development, the Qt windows are just Photoshopped in.
The final design will vary slightly in look, but the overall placement and content will stay the same.