-
Notifications
You must be signed in to change notification settings - Fork 8
Home
Welcome to the stratux_ahrs wiki!
Here, the correct operation of the app will be explained, as well as details on how to contribute and customize the app for specific uses.
This example image was created using simulated data, and shows all visual features of the device.
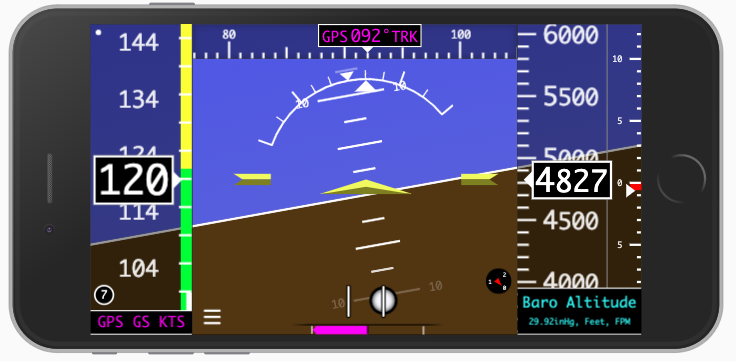
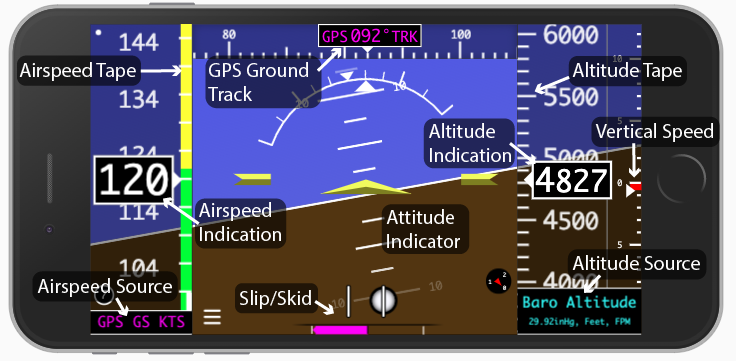
The following image shows the location of the major parts of the display:
 The following image displays some of the parts of the display that may not be inherently obvious:
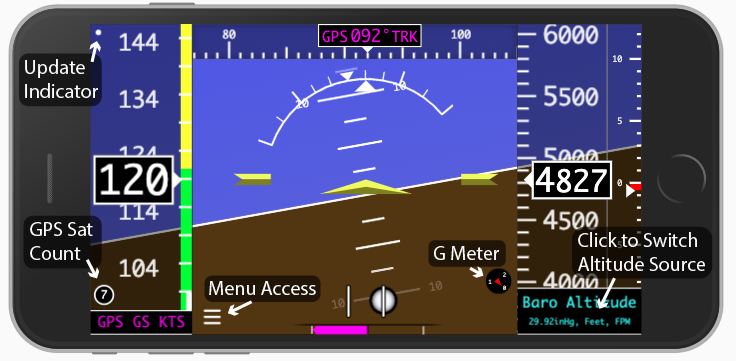
GPS satellite count is displayed in the lower left corner. If the AHRS CPU is above the threshold specified in the configuration (default 70°C), the TEMP banner will also be displayed, as shown in the example below:

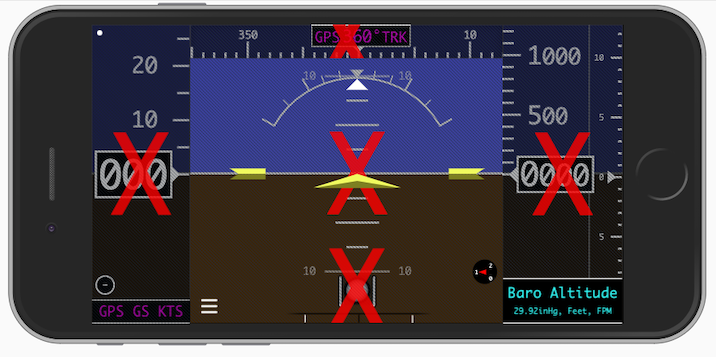
The above image shows what the display looks like when it suspects that data is not valid. This can be caused by a few things:
- There is no AHRS connected (ADS-b off)
- The phone is not on the same network as the AHRS (wrong network)
- The ADSb doesn't have a AHRS module (invalid hardware)
- The connection is temporarily offline, or there is some other error with the data being received (bad data)
If this issue persists and you believe the data and connection should be good (working ADS-b, stopped working "out of the blue", etc.) a good first step is to close the app and restart it, or close and refresh the page in your browser.
There may be times where only portions of the display are shown to be "invalid". This can signify a failure of one system in particular. For example, if the "GPS GS" and "GPS TRK" tapes are invalid, a GPS issue might be the culprit. In this particular case, check the GPS Sat Count badge to see if the system has any satellites. In the above image, the badge is showing "-", which signifies that there are no valid satellites being used.
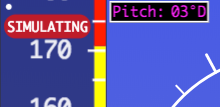
If the device is in Simulation Mode, a tag, as shown below, will appear in the top left corner of the display. This means that the data shown is not valid. Disable Simulation Mode before using the AHRS. This can be done by editing system.simulate in configuration.js, or by tapping the SIMULATING Banner.
There are 3 primary sources of data that the AHRS displays:
- GPS - Used for GPS Speed, GPS Ground Track, and GPS Altitude (if selected)
- IMU (inertial measurement unit) - Used for AHRS attitude information
- Pressure Sensor (Usually attached to the IMU) - Used for Baro Altitude
Each of these sources are relatively independent, so understanding which metrics are dependent on each source can help troubleshoot issues. As a rule of thumb, if all sources are signified as "invalid", there is probably a communication issue between the display and Raspberry pi, especially if ADS-b traffic is correctly being displayed on Foreflight (or other ADS-b wifi display).
Before departing, it's recommended that you calibrate the GYRO at a minimum, to ensure there is no "drift" in flight. In my experience, calibrating on the ground before the run-up is the easiest time. Calibrating the Accelerometer can be done at this time, though it can also be done in the air when a better straight-and-level attitude can be assumed.
To calibrate the GYRO, click the menu icon at the bottom left of the AHRS zone, then click "Calibrate Gyro". A prompt will be displayed to ensure you want to proceed with the calibration. No message is displayed upon completion- simply allow about 3 seconds for the process to complete.
To calibrate the GYRO, click the menu icon at the bottom left of the AHRS zone, then click "Align AHRS". A prompt will be displayed to ensure you want to proceed with the calibration. No message is displayed upon completion- simply allow about 3 seconds for the process to complete.
Altitude and vertical speed can be computed from GPS data, or from pressure data from the IMU's pressure sensor. As a rule of thumb, GPS altitude is closer to actual altitude, but pressure altitude from the IMU is more responsive and produces better vertical speed data. (NOTE: If you have a pressurized cabin, or know your aircraft has a significant separation in cabin pressure vs. outside static pressure, DO NOT use pressure altitude data. Stick to GPS altitude only). Ensure you set the Baro Pressure setting if you are using pressure data.
The source can be easily switched by clicking the teal Altitude Unit field below the altitude tape. The current source will always be displayed in the field ("Baro Altitude", for example).
When using pressure altitude data as the altitude source, set the local baro pressure setting as frequently as you would a standard altimeter. Click the menu icon at the bottom left of the AHRS zone, then click "Set Baro". Next, enter the current baro settings and press "ENT" to apply the changes. To revert back to pressure altitude (IE. baro setting of 29.92inHg), Press "Std. Baro" from the menu.
To use simulation data instead of stratux data (say, for ground testing), there are two possible options:
- Set
system.simulateto true inconfiguration.js. - Append
?simulate=trueto the url of the ahrs app (IE:raspberrypi.local/ahrs?simulate=true).
Note that the simulation data is random and not realistic. Simulation shows the various functions, not actual AHRS data.
If working on a local machine (not the Raspberry pi), set up a local webserver to test the result:
python -m SimpleHTTPServer 8000
Alternatively, the included host.sh script can be used to run the command above:
./host.sh
Now visit the page in the browser via localhost:8000. To view in simulation mode without a change to configuration.js (as discussed above), visit localhost:8000?simulate=true instead.
Stratux AHRS Display :: Stratux Project : AHRS License