Write your presentations in markdown or html and host them all in one place!
Built with Reveal.js and Eleventy.
Requires Node v14+
npm install
npm run serve
serves at
http://localhost:8080/
-
You can write your presentations in markdown, html, or any language that Eleventy supports.
Note about Markdown: if you use Markdown, you still need to separate your slides using
<section>elements. The markdown is translated to html using Eleventy, not RevealJS's markdown plugin. So using---to separate slides won't work. -
Refer to RevealJS's Docs for how to write your markup
- Basic example:
<section>Slide 1</section>
<section>Slide 2</section>
- Nested example:
<section>Horizontal Slide</section>
<section>
  <section>Vertical Slide 1</section>
  <section>Vertical Slide 2</section>
</section>
- Example with notes:
<section>
  <h2>Some Slide</h2>
  <aside class="notes">Shhh, these are your private notes 📝</aside>
</section>
- Basic example:
Eleventy uses frontmatter to manage data for each file/page.
The following variables are required for each presentation if you want it to show up in the list in src/index.html:
layouttitletags
The themeName variable is optional. It's set to black by default.
Example:
# In src/demo-with-markdown/index.md
---
layout: layout_slide.njk # !required
title: "Presentation Demo: Using Markdown" # !required
tags: presentation # !required
themeName: moon # optional
---
Content goes hereAll of RevealJS's built in plugins are pulled in by default. You can manage this in the src/_includes/layout_slide.njk file
You can also make your own plugins.
Custom plugin example:
<!-- in src/_includes/layout_slide.njk -->

<!-- Here's an example plugin which shuffles all slides in a presentation when the T key is pressed -->

<script>
  function Toaster() {
    return {
      id: "toaster",
      init: (deck) => {
        deck.addKeyBinding({ keyCode: 84, key: "T" }, () => {
          deck.shuffle();
          console.log("🍻");
        });
      },
    };
  }

  let deck = new Reveal({
    controls: true,
    progress: true,
    overview: true,
    history: true,
    center: true,
    plugins: [
      RevealHighlight,
      RevealNotes,
      RevealSearch,
      RevealMath,
      RevealZoom,
      Toaster, // You need to add your plugin to this array
    ],
  });
  deck.initialize();
</script>
If you want to get fancy, you can pull in RevealJS from npm instead of from the cdn, but then you'll to have to deal with setting up Javascript bundling with Eleventy.
If you want to edit the styles of the home page (
src/index.html), you can do so insrc/_includes/styles.css.
RevealJS has lots of different themes you can choose from.
By default, the slide theme is set to black.
Each theme is a different stylesheet. You can edit which themes are available in the css imports in src/_includes/layout_slide.njk.
<!-- src/_includes/layout_slide.njk -->
{% set css %}
    ...
    {% include "../../node_modules/reveal.js/dist/theme/black.css" %}
    ...
{% endset %}
By default all of RevealJS's default themes are included, and you can specify a specific theme for each presentation in that presentation file's frontmatter with the themeName variable. For example:
# In src/demo-with-markdown/index.md
---
layout: layout_slide.njk
title: "Presentation Demo: Using Markdown"
tags: presentation
themeName: moon
---
If you do not specify a themeName, the black theme is used by default.
By default, the highlighting theme is set to monokai. Each theme is a different stylesheet. If you would like to change your syntax highlighting theme, you can edit its css import in the layout_slide.njk file.
{% set css %}
    {% include "../../node_modules/reveal.js/plugin/highlight/monokai.css" %}
{% endset %}
A full list of available highlight themes can be found at https://highlightjs.org/static/demo/.
- Open your presentation with
print-pdfincluded in the query string, for example:http://localhost:8000/?print-pdf. You can test this atrevealjs.com/demo?print-pdf. - Open the in-browser print dialog (
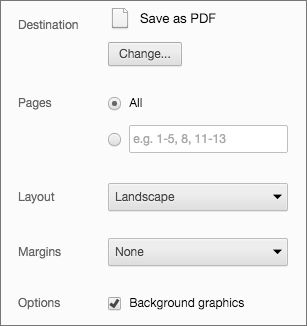
CTRL/CMD+P). - Change the Destination setting to Save as PDF.
- Change the Layout to Landscape.
- Change the Margins to None.
- Enable the Background graphics option.
- Click Save 🎉
reveal.js comes with a speaker notes plugin which can be used to present per-slide notes in a separate browser window. The notes window also gives you a preview of the next upcoming slide so it may be helpful even if you haven't written any notes. Press the »S« key on your keyboard to open the notes window.
A speaker timer starts as soon as the speaker view is opened. You can reset the timer by clicking on it.
Notes are defined by appending an <aside> element to a slide as seen below. You can add the data-markdown attribute to the aside element if you prefer writing notes using Markdown.
Alternatively you can add your notes in a data-notes attribute on the slide. Like <section data-notes="Something important"></section>.
<section>
  <h2>Some Slide</h2>

  <aside class="notes">Shhh, these are your private notes 📝</aside>
</section>
