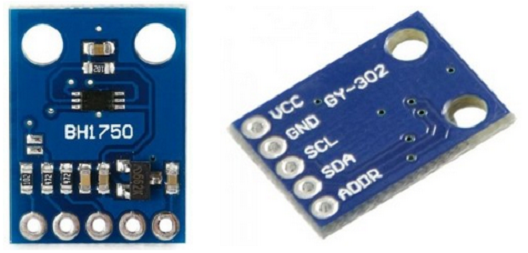
This is a 16-bit BH1750 digital ambient light sensor on a GY-302 breakout PCB:
- Measurement in LUX
- Three operation modes:
- Continues conversion
- One-time conversion
- Three selectable resolutions:
- Low 4 LUX resolution (low power)
- High 1 LUX resolution
- High 0.5 LUX resolution
- Asynchronous and synchronous conversion
- Operating voltage: 3.3V .. 4.5V max
- Low current by power down: max 1uA
- I2C bus interface: max 400kHz
- Ambience light:
- Range: 1 - 65535 lx
- Deviation: +/- 20%
- Selectable resolutions:
- 4 lx (low resolution, max 24 ms measurement time)
- 1 lx (mid resolution max 180 ms measurement time)
- 0.5 lx (high resolution 180 ms measurement time)
- No additional electronic components needed
- Supply voltage: 3.3 .. 5V
- 5V tolerant I2C SCL and SDA pins
- 2 selectable I2C addresses with ADDR pin high or low/floating
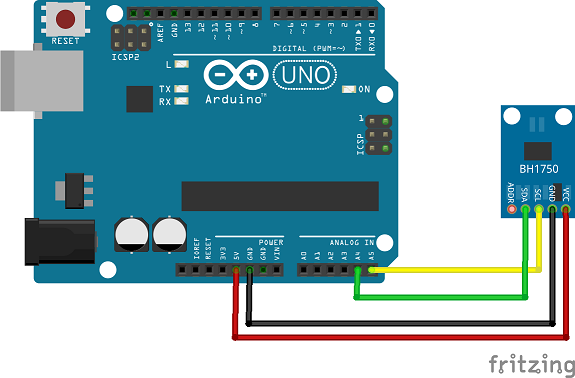
Connection Arduino UNO board - BH1750
| Pins board - BH1750 | VCC | GND | SDA | SCL |
|---|---|---|---|---|
| Arduino UNO (ATMega328 boards) | 5V | GND | A4 | A5 |
| Arduino Mega2560 | 5V | GND | D20 | D21 |
| Arduino Leonardo | 5V | GND | D2 | D3 |
| Arduino DUE (ATSAM3X8E) | 3V3 | GND | 20 | 21 |
| ESP8266 | 3V3 | GND | GPIO4 (D2) | GPIO5 (D1) |
| ESP32 | 3V3 | GND | GPIO21 | GPIO22 |
Note: Tested ESP8266 / ESP32 boards:
- ESP8266 boards: ESP12E / WeMos D1 & R2 / Node MCU v2 / v3
- ESP32 boards: WeMos LOLIN32 / LOLIN D32
Other unlisted MCU's may work, but are not tested.
Change the following Wire initialization to:
// WeMos LOLIN32 with OLED support
Wire.begin(5, 4);-
ADDRpinLOWfor I2C address 0x23 (0x46 including R/W bit) -
ADDRpinHIGHfor I2C address 0x5C (0xB8 including R/W bit)
Note: ADDR pin may be floating (open) which is the same as LOW.
Examples | Erriez BH1750:
- ContinuesMode | BH1750ContinuesAsynchronous
- ContinuesMode | BH1750ContinuesBasic
- ContinuesMode | BH1750ContinuesHighResolution
- ContinuesMode | BH1750ContinuesLowResolution
- ContinuesMode | BH1750ContinuesPowerMgt
- OneTimeMode | BH1750OneTimeBasic
- OneTimeMode| BH1750OneTimeHighResolution
- OneTimeMode| BH1750OneTimeLowResolution
- OneTimeMode| BH1750OneTimePowerMgt
#include <Wire.h>
#include <ErriezBH1750.h>

// ADDR line LOW/open:  I2C address 0x23 (0x46 including R/W bit) [default]
// ADDR line HIGH:      I2C address 0x5C (0xB8 including R/W bit)
BH1750 sensor(LOW);

void setup()
{
  Serial.begin(115200);
  Serial.println(F("BH1750 continues measurement high resolution example"));

  // Initialize I2C bus
  Wire.begin();

  // Initialize sensor in continues mode, high 0.5 lx resolution
  sensor.begin(ModeContinuous, ResolutionHigh);

  // Start conversion
  sensor.startConversion();
}

void loop()
{
  uint16_t lux;

  // Wait for completion (blocking busy-wait delay)
  if (sensor.isConversionCompleted()) {
    // Read light
    lux = sensor.read();

    // Print light
    Serial.print(F("Light: "));
    Serial.print(lux / 2);
    Serial.print(F("."));
    Serial.print(lux % 10);
    Serial.println(F(" LUX"));
  }
}
Output
BH1750 continues measurement high resolution example
Light: 15.0 LUX
Light: 31.2 LUX
Light: 385.0 LUX
Light: 575.1 LUX
Light: 667.5 LUX#include <Wire.h>
#include <ErriezBH1750.h>
// ADDR line LOW/open: I2C address 0x23 (0x46 including R/W bit) [default]
// ADDR line HIGH: I2C address 0x5C (0xB8 including R/W bit)
BH1750 sensor(LOW);
void setup()
{
// Initialize I2C bus
Wire.begin();
// Initialize sensor with a mode and resolution:
// Modes:
// ModeContinuous
// ModeOneTime
// Resolutions:
// ResolutionLow (4 lx resolution)
// ResolutionMid (1 lx resolution)
// ResolutionHigh (0.5 lx resolution)
sensor.begin(mode, resolution);
}Wire.begin(); and sensor.begin(); must be called before starting the conversion:
sensor.startConversion();The sensor conversion completion status can be checked asynchronously before reading the light value:
bool completed = sensor.isConversionCompleted();The sensor conversion completion status can be checked synchronously before reading the light value:
// Wait for completion
// completed = false: Timeout or device in power-down
bool completed = sensor.waitForCompletion();One-time mode: The application must wait or check for a completed conversion, otherwise the sensor may return an invalid value. Continues mode: The application can call this function without checking completion, but is not recommended when accurate values are required.
Read sensor light value:
// lux = 0: No light or not initialized
uint16_t lux = sensor.read();
For 4 lx low and 1 lx high resolutions:
// Print low and medium resolutions
Serial.print(F("Light: "));
Serial.print(lux);
Serial.println(F(" LUX"));
For 0.5 lx high resolution:
// Print high resolution
Serial.print(F("Light: "));
Serial.print(lux / 2);
Serial.print(F("."));
Serial.print(lux % 10);
Serial.println(F(" LUX"));The device enters power down automatically after a one-time conversion.
A manual power-down in continues mode can be generated by calling:
sensor.powerDown();- Built-in
Wire.h
Please refer to the Wiki page.

