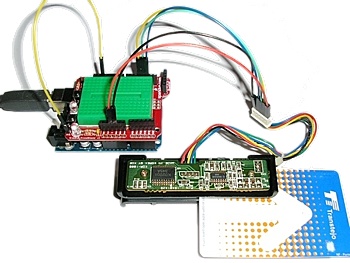
MagStripe is an Arduino library to interface with TTL (raw) magnetic card readers. It supports reading any of the cards' possible three tracks, but not simultaneously. Most cards only contain data on tracks 1 and 2 though.
There are many brands of TTL magnetic card readers on the market, some with a fixed reading head and others with screws allowing the head to be manually positioned to choose one of the tracks. The connector comes with varying colors for each wire, but usually there are five wires with the following order and function:
- Ground (black wire)
- RDT/data
- RCL/clock
- CLS/card present
- Power/+5V (red wire)
For more information, you can check the KDE KDR-1000 datasheet (pictured above), which can read all three tracks by repositioning the head, or the Panasonic ZU-M1121 datasheet for an example of another reader which can only read track 2 and has a different pin arrangement.
Note: This library is designed for swipe-type readers (like the one pictured above) meaning it requires the CLS pin to be active low while the card is being swiped and high otherwise. Insert-type readers usually have the CLS pin connected to a switch instead (active high when the card is fully inserted and low otherwise). This behavior is not supported by this library. Check your reader's datasheet if you're not sure how your reader behaves.
Download the latest zip file from the releases section. Then open it from the Sketch > Include Library > Add .ZIP Library... menu inside the Arduino IDE and a new "MagStripe" entry should appear in the Sketch > Include Library and File > Examples menus.
Connect your card reader to the following digital pins of the Arduino Uno (or other arduinos based on the ATmega8/168/328 processors):
| Arduino Pin | Card Reader Pin |
|---|---|
| Digital Pin 2 | RDT/data |
| Digital Pin 3 | RCL/clock |
| Digital Pin 4 | CLS/card present |
The Arduino Leonardo or Arduino Micro (or other arduinos based on the ATmega32U4 processor) have a diferent interrupt pin assignment so, if you have one of these, connect the wires like this instead (swapped clock/data wires):
| Arduino Pin | Card Reader Pin |
|---|---|
| Digital Pin 2 | RCL/clock |
| Digital Pin 3 | RDT/data |
| Digital Pin 4 | CLS/card present |
If your reader can read multiple tracks at a time, and thus has extra sets of data and clock wires, check its datasheet and use the ones appropriate for the track you want to read.
The library has a thin interface and is very straightforward to use, just check if there is a
card present before trying to read. The included MagStripeReader.ino
example shows how to do it.
The read() method does the necessary validation checks and only returns data if it has been read correctly
from the card. The data returned is a string with the (ASCII) full contents of the track, including the control
characters.
To know about the format of data returned for each track, check the magnetic card standards reference.

